The projects
How projects works ?
In the Understanding Antigone's architecture section, we covered the topic of project structure. In this section, we'll see how to use projects.
As you've understood, in Antigone the project is the container that holds every parameter of the module — including up to 6 simultaneous instruments. You can save and load as many projects as you want on the SD card.
Main project screen
The project screen is the first screen displayed when the module is powered on. It provides an overview of the instruments and their voices, and it is the starting point to create a new project, save the current one, load an existing one, edit the voice layout, and reach every other component of the module.
The PROJECT screen has a single tab — INSTR — focused on the instruments and the voice layout. Project-level components (Macros, Mixer, Mod matrix, Clock) are reached through the Shortcut menu described below.
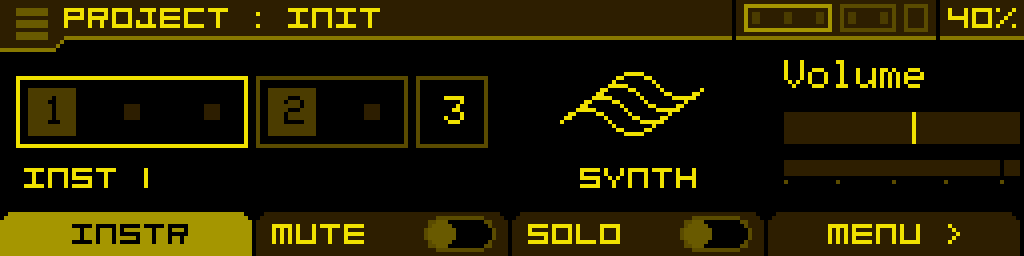
INSTR tab
Representation of instruments and voices
The numbers from 1 to 6 represent the 6 voices of Antigone. In the example configuration above, we can see 3 groups of voices representing 3 instruments:
- A first instrument with 3 polyphonic voices (voices 1-2-3). The highlighted square on main voice 1 indicates a machine is loaded in this instrument. A brighter border also surrounds this instrument, indicating it is currently selected. (You can change this selection by turning the encoder left or right.)
- A second instrument with 2 polyphonic voices (voices 4-5). The highlighted square on main voice 4 shows that a machine is loaded in this instrument.
- The third instrument has no machine loaded, and is therefore not usable.
Each time a note is played on a voice, a highlighted square is also displayed.
This voice configuration is what we call the voice layout in Antigone. A full section on configuring this layout is available in the Voice layout page.
This voice representation is always visible in the screen header and always lets you know which instrument you're currently editing. The voices also light up when a note is played.
Editing the voice layout
The voice layout is a property of the project itself — it is no longer stored as a separate preset. To edit it directly from the INSTR tab, long-press the encoder on the selected instrument: the module enters layout mode. Turning the encoder then changes the size of the group (i.e. the number of voices) of the selected instrument. Once you have something you like, the footer shows < UNDO / COMMIT > — pressing COMMIT > asks for confirmation, then applies the new layout. < UNDO reverts to the previous configuration.
For the full procedure (including layout templates and edge cases), see Voice layout.
Instrument name and icon
Below the voice layout, you'll see the name of the selected instrument. Here, it's labeled "INST 1" by default. If a preset exists, its name will be used instead.
To the right of the voice layout, the icon represents the machine loaded into the instrument.
Instrument volume
A volume parameter for the selected instrument is directly accessible from this page and can be adjusted using the potentiometer below (4). This same parameter is also available in the Mixer.
Accessing an instrument's parameters
To access the selected instrument, simply press the encoder. You'll then enter the configuration screen of an Instrument.
Footer buttons
The footer of the PROJECT screen offers four buttons:
| INSTR | MUTE | SOLO | MENU > |
| Stays on / refreshes the INSTR tab. | Toggles mute on the currently selected instrument. Muted instruments are drawn with a dotted border in the voice layout. | Toggles solo on the currently selected instrument. When at least one instrument is soloed, all non-soloed ones are silenced; soloed instruments are drawn with a thicker border. | Opens the Shortcut menu. |
Shortcut menu
The shortcut menu is the central hub used to reach the project-level components and to jump quickly between instruments. It can be opened in two equivalent ways:
- from the PROJECT screen, by pressing the MENU > footer button;
- from any screen of the module, by holding ALT and turning the encoder.
It contains:
- INSTR 1, INSTR 2, … — one entry per instrument loaded in the current project, jumps directly to that instrument's editing screen.
- MACROS — opens the Macros screen.
- MIXER — opens the Mixer.
- MOD MATRIX — opens the Modulation matrix.
- CLOCK — opens the Clock screen.
Tip: because the shortcut menu is reachable from anywhere via ALT + encoder, you don't have to come back to the PROJECT screen to switch instrument or open the Mixer / Mod matrix / Clock / Macros — make this combo a reflex.
Burger menu
Located in the top-left corner, the burger menu becomes accessible when highlighted (turn the encoder fully to the left, then press it).
From the burger menu, you can:
- Project browser — open the project file browser on the SD card.
- Save project — save the current project.
- Save project as... — save the project under a new name.
- New project — opens a submenu with project templates stored on the SD card.
- Settings
- Calibration — opens the calibration procedure (see Calibration).
- System info — see System info.
For more details about project files and templates, see File templates.
The voice layout is no longer in the burger menu. It is now a property of the project itself, edited inline as described in Editing the voice layout above.